| Resin Problems However, I encountered huge problems in the quality. I would make 20 at a time, and of the 20, only 5 would be good enough with perfectly clear, flat glass set back in the brass tube. The other 15 would have imperfections such as bubbles or wrinkles. I tried working slower, putting the resin in with a toothpick, a brush, pouring carefully; I still ended up each time oddly enough, with 5 or 6 good out of 20. By round 4 of this process, I had 21 perfect Bullauge, but 59 that are not good enough for me to use. At that rate, if I wanted 188 perfect Bullauge that actually looked like the real thing, I will have to make 752...... One day, I made 24 portholes and had a 0% success rate. I poured the resin in a cup and then got distracted, (easily done). I had so many little cups full of hardened resin on my table, I think I grabbed one of these used cups, and put the hardener in it. Then I grabbed the new resin cup (no hardener!) and filled all 24 portholes. The next morning, they were same as when I left them; 24 portholes full of sticky resin. So they all went into the trash. |
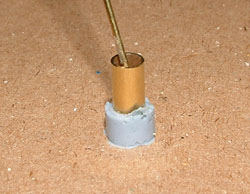
| Bullauge The problem (besides no hardener that one time!) is that the resin was not sitting flat on the plug, and there were air bubbles. The resin sets very quickly, so I experimented and found that by only making 10 to 15 at a time the resin was more liquid. For each one, I placed a small drop of resin on the flat part of the plug first, then placed the brass tube on the plug, then filled it with resin. I then used a small piece of brass wire to stir the resin in each porthole to make sure the bubbles were out and all of the flat part of the silicone plug had resin on it. Using this method, I ended up with a 90% success rate. Out of 15, I would get 12 or 13 perfect, flat clear Bullauge. |
 Click Once To Enlarge |
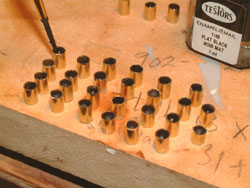
| Painting the Backs To prevent any light from coming through the portholes (which it would on the superstructure), each batch of portholes had a glob of black paint applied to the inside. |
 Click Once To Enlarge |
 |
| Completing the Hull Intro / New Rudder / Fixing the Casemates / Booms / Stairs / New Sponsons / Bugzier/ Portholes / Deck Fittings / Railings / Decals / Final Product |